
Attendance Configuration

May 29, 2025
 93
93
To use the Attendance Module, it has to be enabled by the Support/Sales team for each tenant. To get the Attendance Module available to be enabled, contact your Customer Success Representative.
How to Configure Company Level Attendance Settings in Riskcast
This document outlines the steps to configure the attendance settings for your entire company within Riskcast. These settings will apply globally to all employees unless overridden at a different level (zone/project or individual).
Prerequisites:
- You must have appropriate administrative permissions in Riskcast to access and modify company settings.
- Riskcast customer service must have allowed the tenant to use the Attendance Module.
Steps:
-
Navigate to Company Settings:
- From the main Riskcast dashboard, click on "Companies" in the top navigation bar.
- Select "Wayne Enterprises, Inc." (or your relevant company name) from the list.
-
Access Attendance Options:
- Within the company settings, click on the "OPTIONS" tab.
- On the left-hand menu, under "General," click on "Attendance."
-
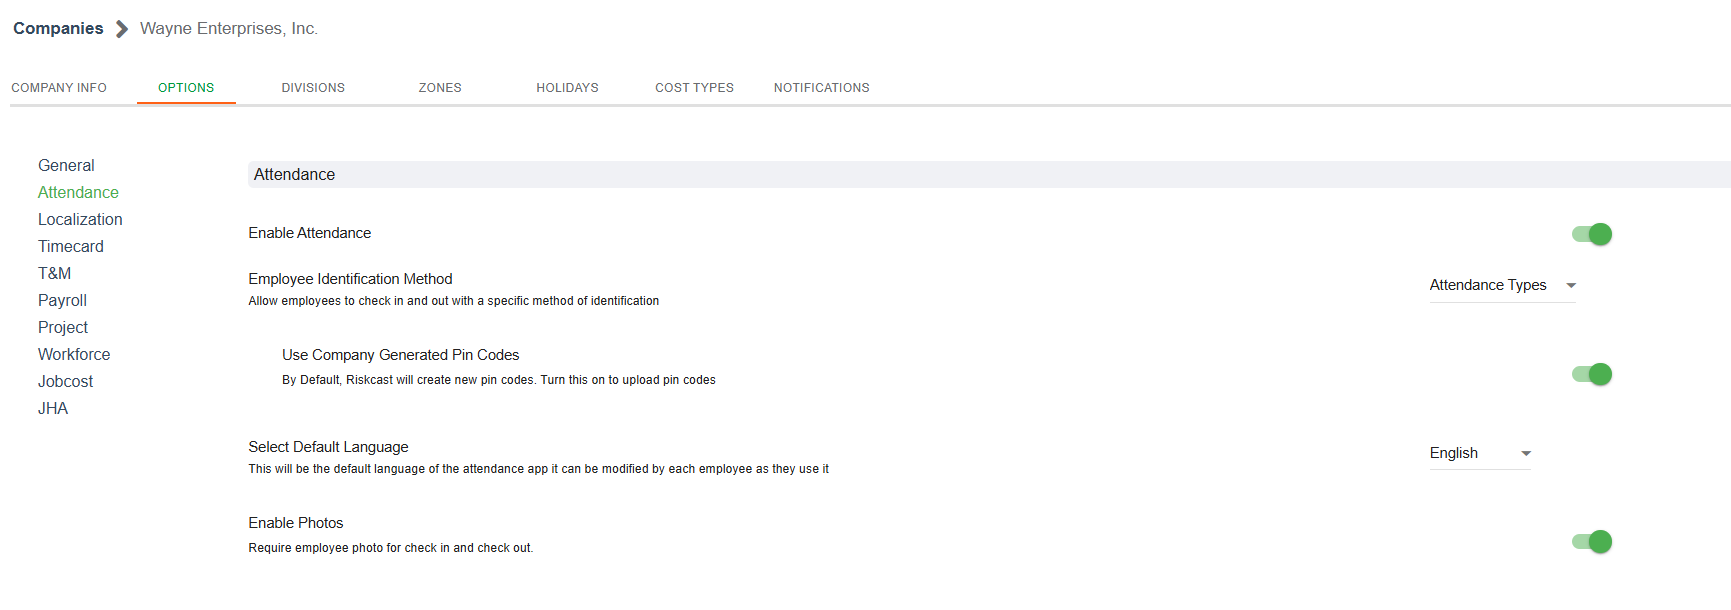
Configure Attendance Settings:
-
Enable Attendance:
- To activate the attendance tracking feature for your company, toggle the switch next to "Enable Attendance" to the green (ON) position.
- (Optional) If you wish to disable attendance tracking at a later time, toggle the switch to the gray (OFF) position.
-
Employee Identification Method:
- This setting allows you to define how employees will check in and out. Click on the dropdown menu next to "Attendance Types" to select the desired identification method (e.g., PIN, Name, QR code)
-
Use Company Generated Pin Codes:
- If you want Riskcast to automatically generate new PIN codes for employees, toggle the switch next to "Use Company Generated Pin Codes" to the green (ON) position.
- (Optional) If you prefer to manually assign PIN codes or use another method, toggle this switch to the gray (OFF) position and upload your PIN codes.
-
Select Default Language:
- Choose the default language for the attendance application. Click on the dropdown menu next to "English" and select your preferred language.
-
Enable Photos:
- If you require employees to take a photo during check-in and check-out, toggle the switch next to "Enable Photos" to the green (ON) position.
- (Optional) If photos are not required, toggle this switch to the gray (OFF) position.
-
-
Save Changes:
- After making your desired configurations, ensure you save your changes.

